SwiftUI Essentials - Creating and Combining Views
SwiftUI 튜토리얼 1
드디어 swiftUI를 좀 보려고 합니다.
swiftUI에 대해서 듣고 가장 먼저 떠올랐던 건 예전 iPhone 3gs 모델이 한국에 처음 들어올 때 나왔던 TV광고가 떠올랐습니다.
비 개발자들이 한 명씩 나와서 자기가 만든 앱을 소개하곤 들어가는 간단한 내용이었습니다.
자세히는 기억 안 나지만 기억을 더듬어보면 사람이 나와서
"상사 뺨 때리는 앱을 만들었는데 손맛이 나름 있더라고요 앱스토어에서 만나보세요"
대충 뭐 이런 말 하고 사라집니다.
이게 바로 코앞이구나 생각했습니다.
애플이 앱스토어를 만든 궁극적인 목적은 프로그래머가 아니어도 앱을 쉽게 만들어서 너도 나도 올릴 수 있게 하는 것이었는데요
그동안은 말처럼 쉬운 일은 아니었습니다.
쓰다 보니 잠깐 다른 말을 하자면 쉽게 만들게 하고 싶었으면서 왜 그렇게 리젝을 줬는지 싶네요... 뭐 지금은 이틀이면 올라가지만 나름 초기 개발자로서 리젝은 정말 보통의 고통이 아녔습니다.
다시 본론으로 돌아와서 swiftUI가 이런 애플의 목적을 이뤄주겠구나 싶었습니다. 더불어 저는 얼른 다른 밥벌이를 찾아야겠습니다.
이 튜토리얼은 내가 좋아하는 장소를 발견하고 공유하기 위한 iOS 앱인 랜드 마크를 구축하는 과정을 안내합니다. 랜드 마크의 세부 사항을 표시하는 뷰를 만들며 시작할 것입니다.
뷰를 배치하기 위해 Landmarks는 스택을 사용하여 이미지 및 텍스트뷰 컴포넌트를 결합하고 계층화합니다. 뷰에 지도를 추가하려면 표준 MapKit 컴포넌트를 포함시켜야합니다. 뷰 디자인을 세분화할 때 Xcode는 실시간 피드백을 제공하여 이러한 변경 사항이 코드로 어떻게 변환되는지 확인할 수 있게 해 줍니다.
This tutorial guides you through building Landmarks — an iOS app for discovering and sharing the places you love. You’ll start by building the view that shows a landmark’s details.
To lay out the views, Landmarks uses stacks to combine and layer the image and text view components. To add a map to the view, you’ll include a standard MapKit component. As you refine the view’s design, Xcode provides real-time feedback so you can see how those changes translate into code.
프로젝트 생성 및 캔버스 (Create a New Project and Explore the Canvas)
SwiftUI를 사용하는 새 Xcode 프로젝트를 작성하겠습니다. 캔버스, 미리 보기 및 SwiftUI 템플릿 코드를 살펴볼 겁니다.
Xcode에서 캔버스를 이용하여 미리보기를 사용하고 뷰와 상호작용하려면 Mac이 macOS Catalina 10.15 버전 이상이어야 합니다.
Create a new Xcode project that uses SwiftUI. Explore the canvas, previews, and the SwiftUI template code.
To preview and interact with views from the canvas in Xcode, ensure your Mac is running macOS Catalina 10.15.

Step 1
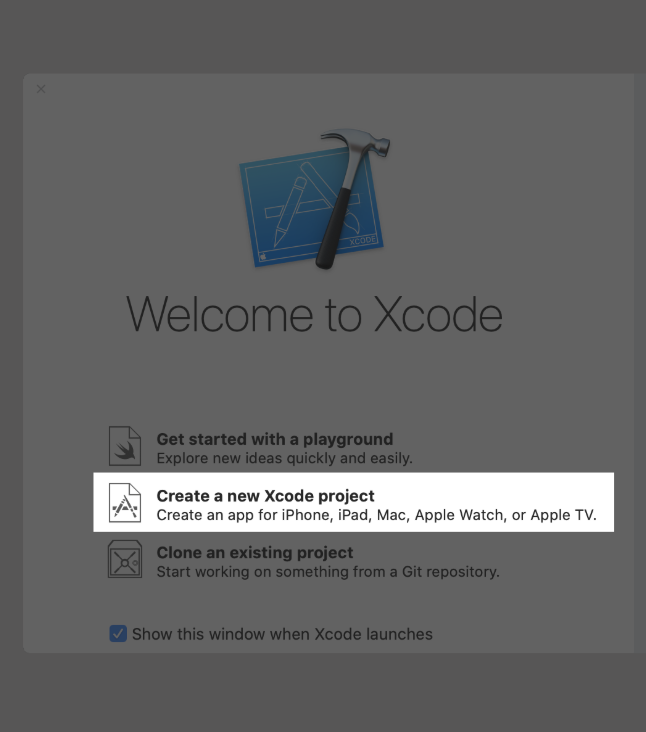
Xcode 새 프로젝트를 생성합니다. Create a now Xcode project를 선택합니다.
Open Xcode and either click Create a new Xcode project in Xcode’s startup window, or choose File > New > Project.
Step 2
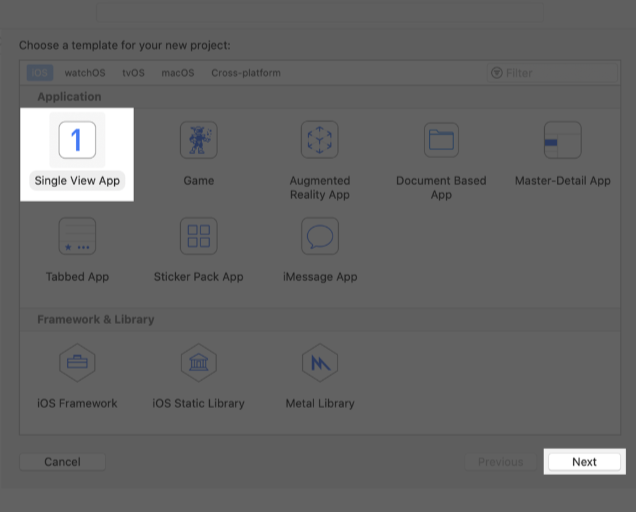
Single View App을 선택합니다.
In the template selector, select iOS as the platform, select the Single View App template, and then click Next.
Step 3
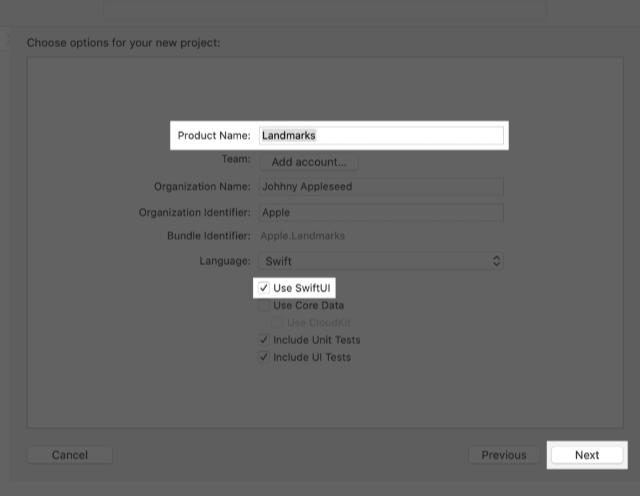
프로젝트명을 Landmarks라고 입력합니다.
가장 중요한 Use SwiftUI 체크박스를 선택합니다.
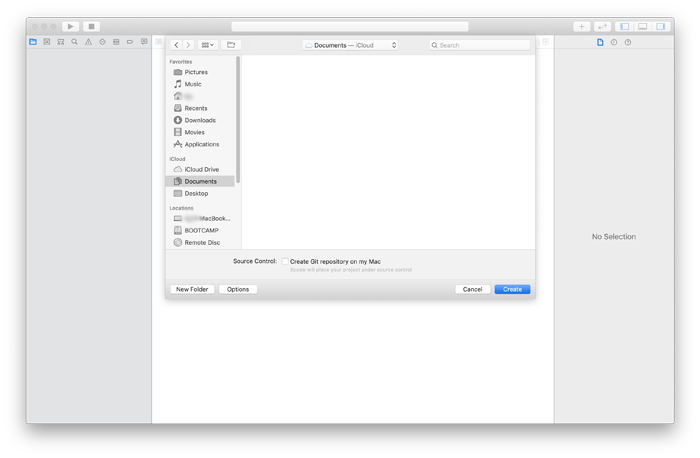
다음엔 프로젝트 파일을 저장할 위치를 선택합니다.
Enter “Landmarks” as the Product Name, select the Use SwiftUI checkbox, and click Next. Choose a location to save the Landmarks project on your Mac.
Step 4
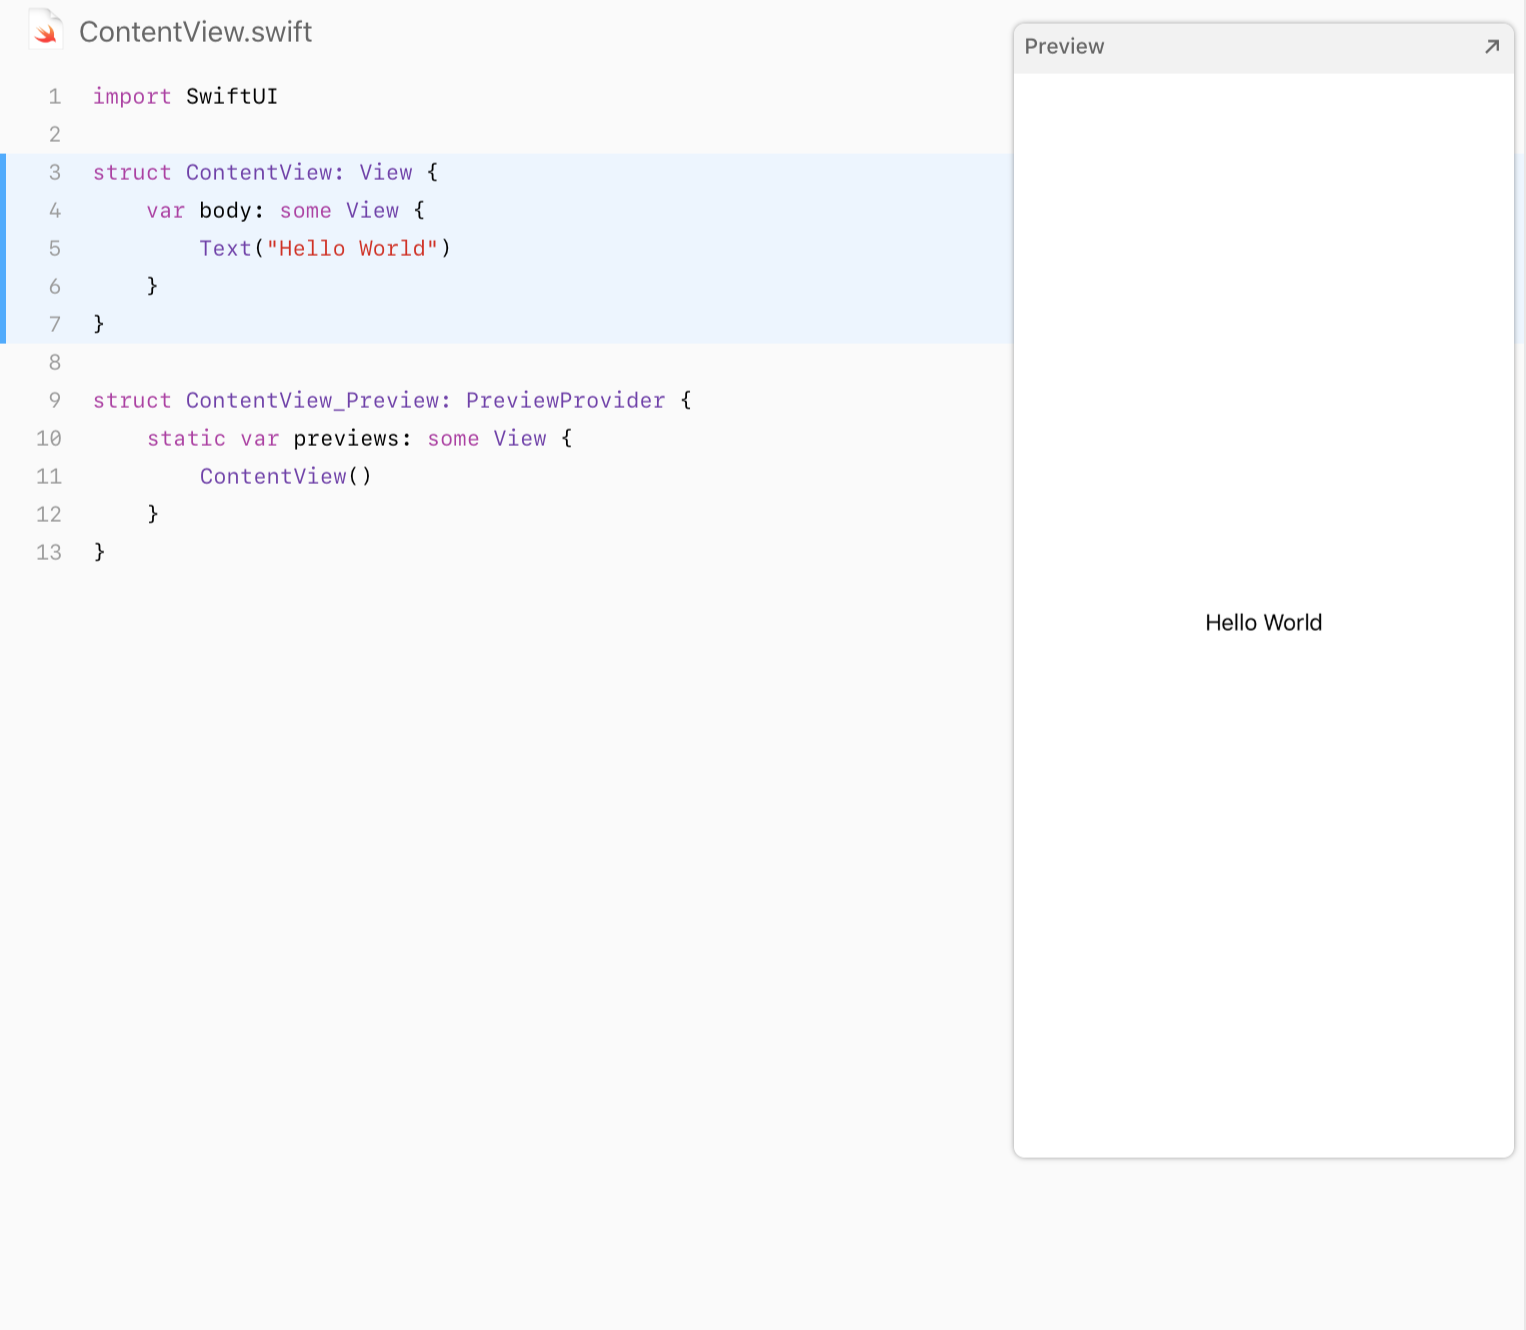
Project navigator에서 ContentView.swift를 선택합니다.
기본적으로 두 개의 struct가 선언되어있습니다.
첫 번째 struct는 View protocol을 채택하고 view의 레이아웃을 나타냅니다.
두 번째 struct는 view에 대한 preview를 선언합니다.
In the Project navigator, click to select ContentView.swift.
By default, SwiftUI view files declare two structures. The first structure conforms to the View protocol and describes the view’s content and layout. The second structure declares a preview for that view.
Step 5
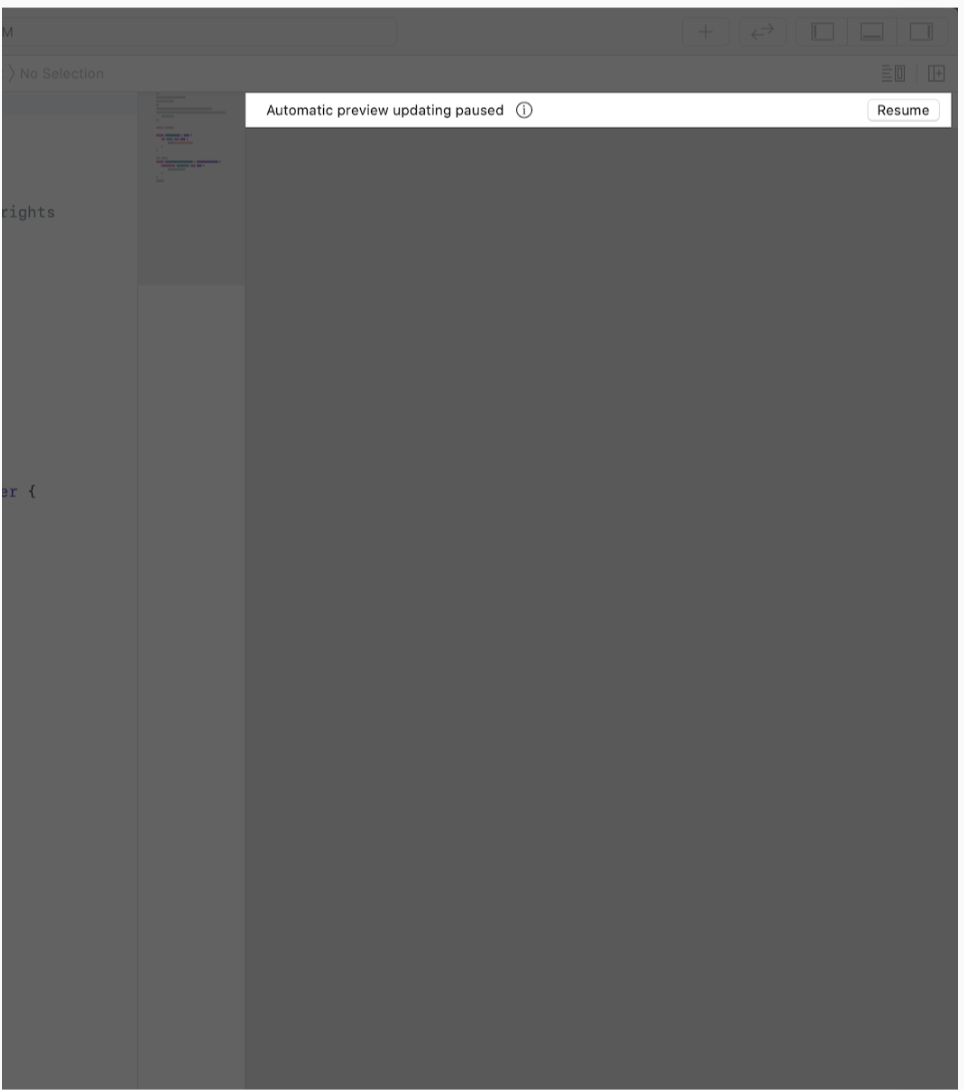
캔버스의 resume버튼을 preview를 보기 위해서 클릭합니다.
캔버스가 안보이신다면 Editor > Editor and Convas를 선택해보세요.
In the canvas, click Resume to display the preview.
Tip
If the canvas isn’t visible, select Editor > Editor and Canvas to show it.
Step 6
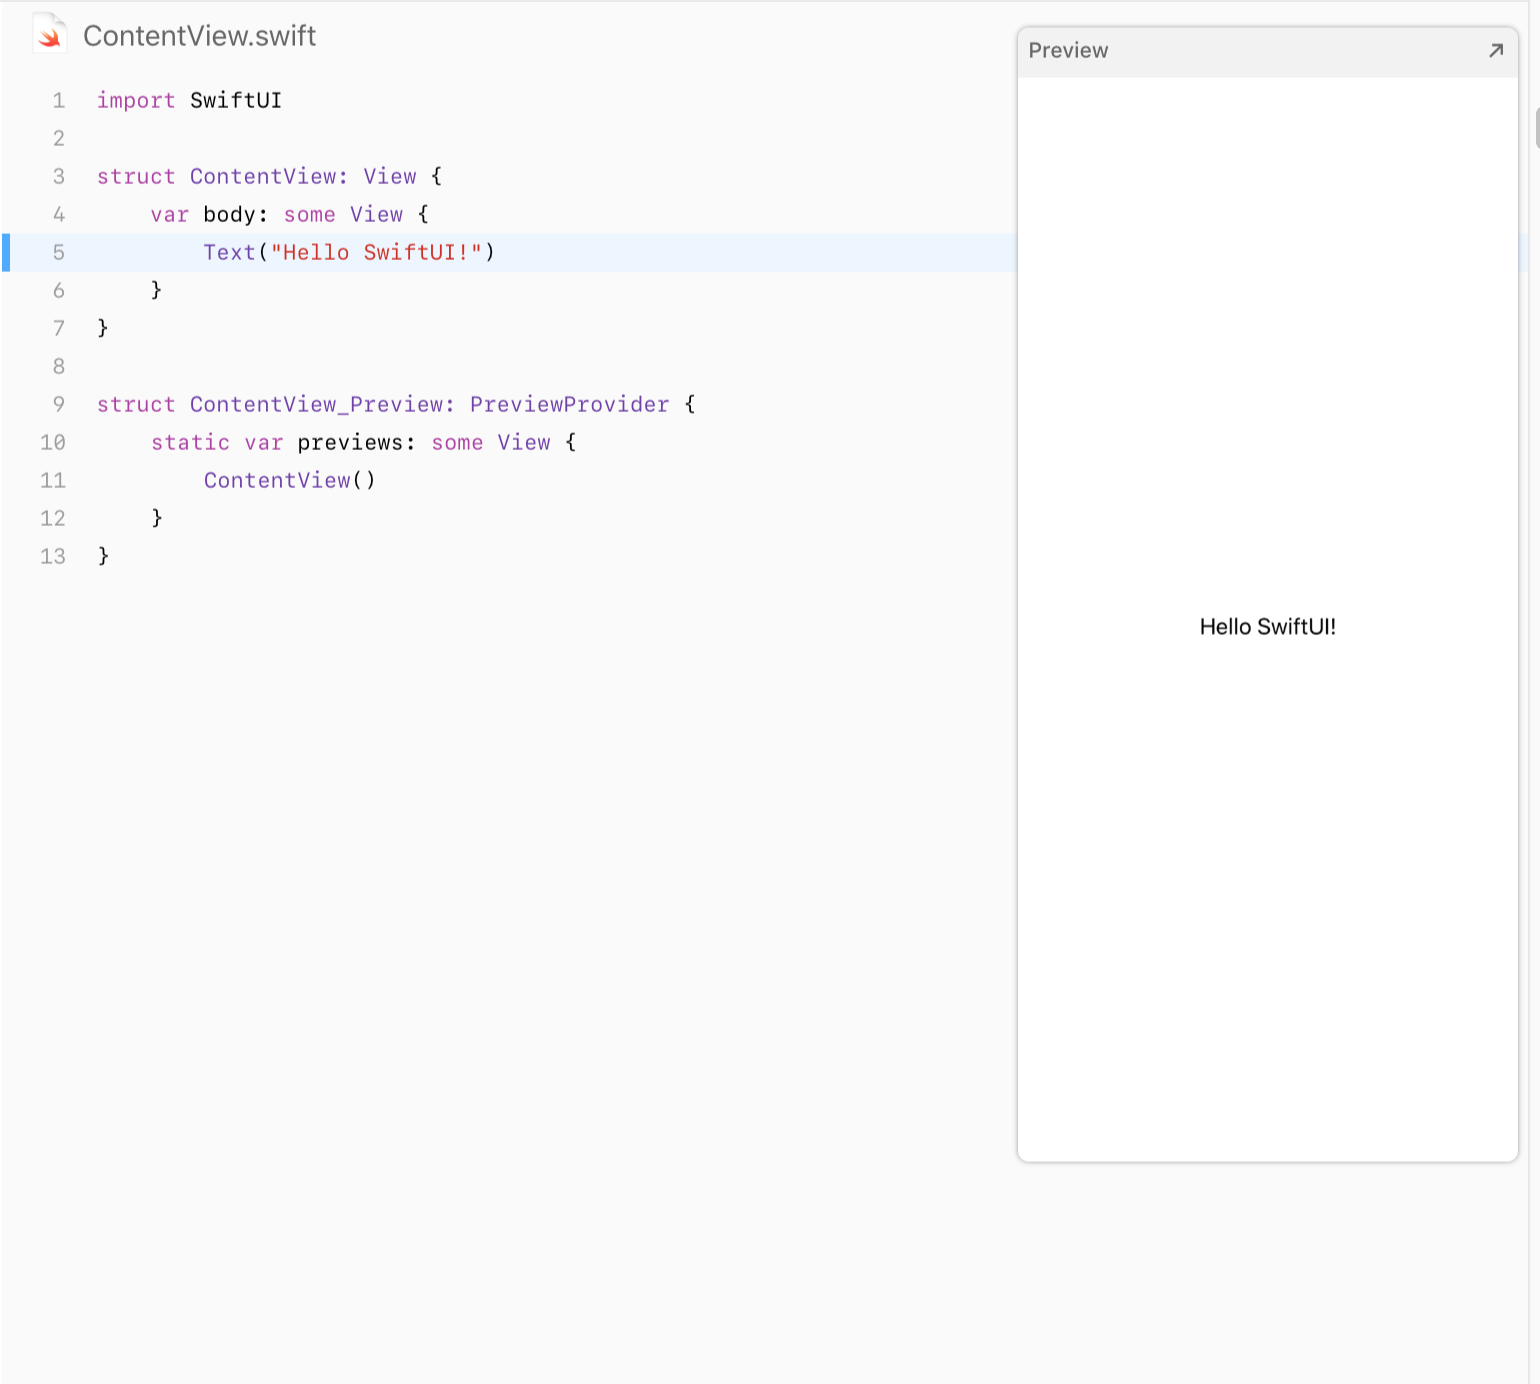
body 프로퍼티 안에 Hellow World를 다른 말로 변경해보세요!
프로퍼티를 변경하면 미리보기가 당신이 변경한 다른 말로 업데이트됩니다.
Inside the body property, change “Hello World” to a greeting for yourself.
As you change the code in a view’s body property, the preview updates to reflect your changes.
커스텀 텍스트뷰 (Customize the Text View)
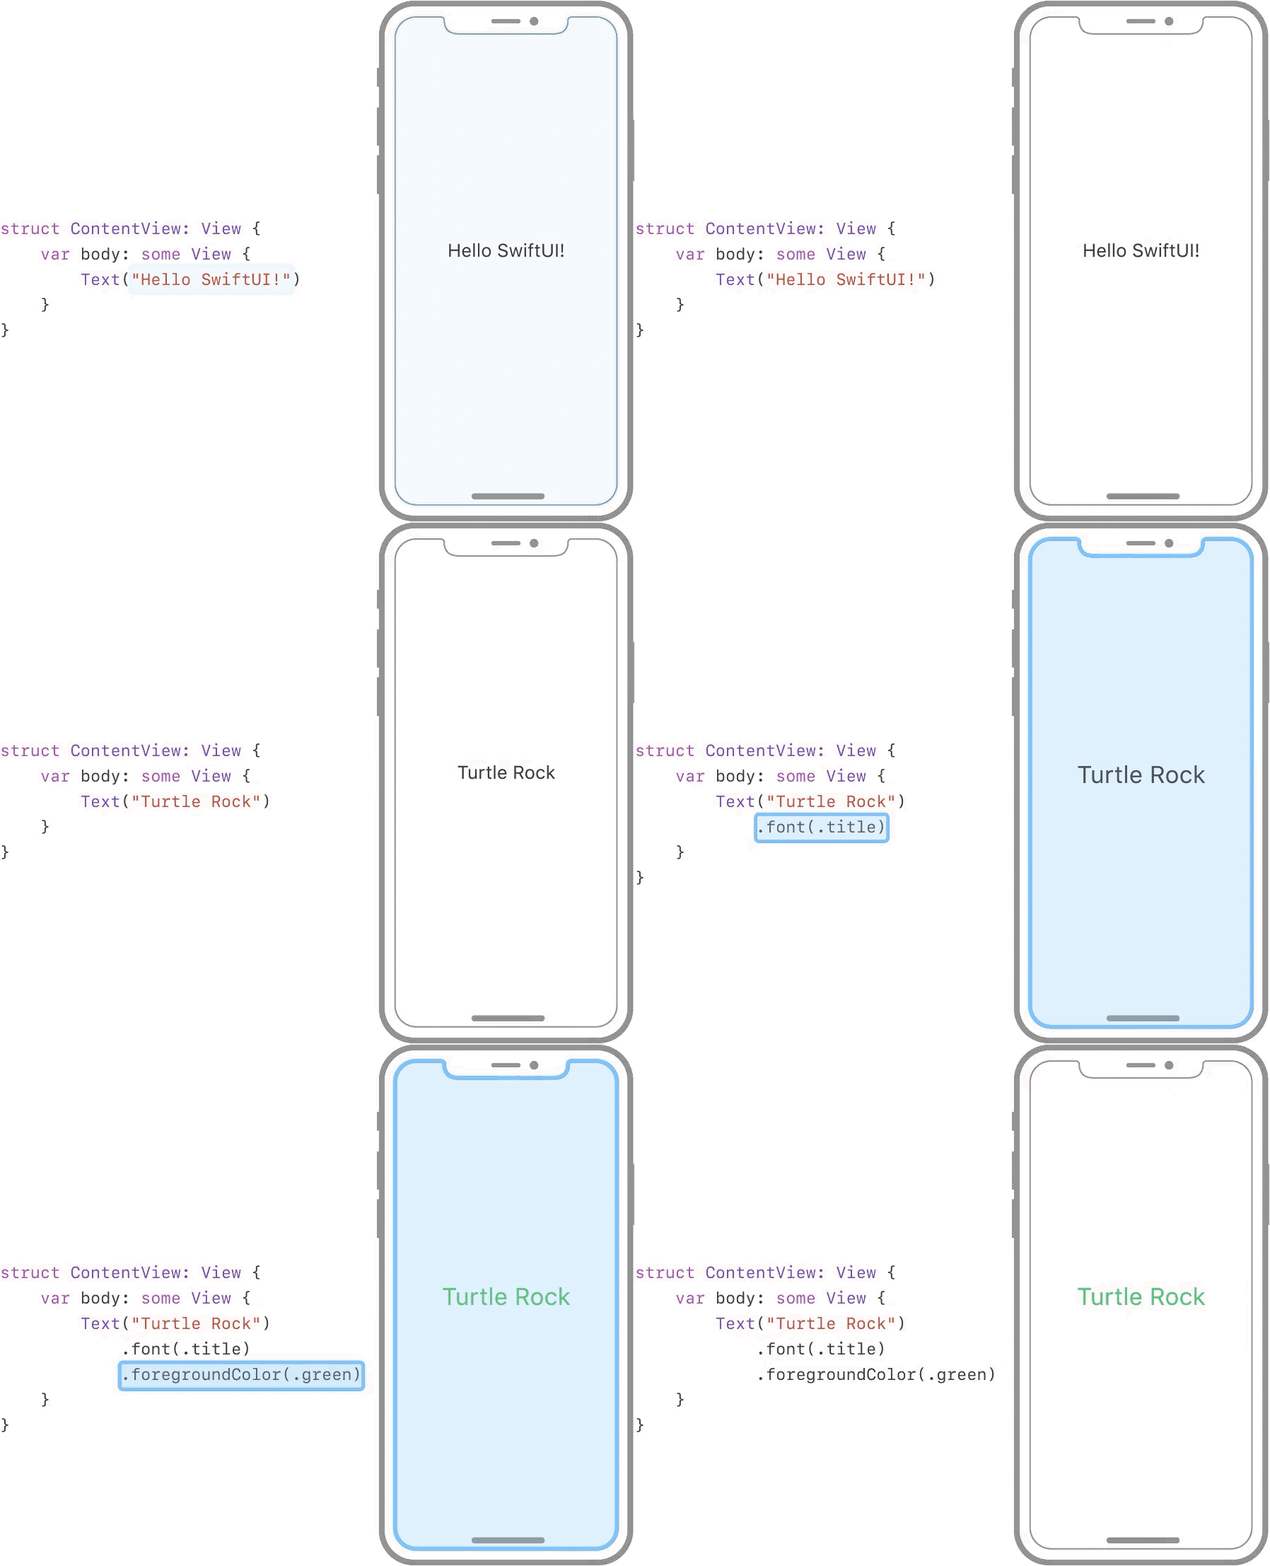
코드를 변경하거나 인스팩터(inspector)를 통해 사용 가능한 항목을 참고하여 사용해서 뷰(view)를 커스텀할 수 있습니다.
Landmarks 앱을 빌드할 때 소스 에디터, 캔버스 또는 인스팩터와 같은 편집기 조합을 사용할 수 있습니다. 사용하는 툴(tool)에 관계없이 코드가 업데이트된 상태로 유지됩니다.
You can customize a view’s display by changing your code, or by using the inspector to discover what’s available and to help you write code.
As you build the Landmarks app, you can use any combination of editors: the source editor, the canvas, or the inspectors. Your code stays updated, regardless of which tool you use.
인스펙터를 사용하여 텍스트뷰를 커스텀해보겠습니다.
Next, you’ll customize the text view using the inspector.
Step 1
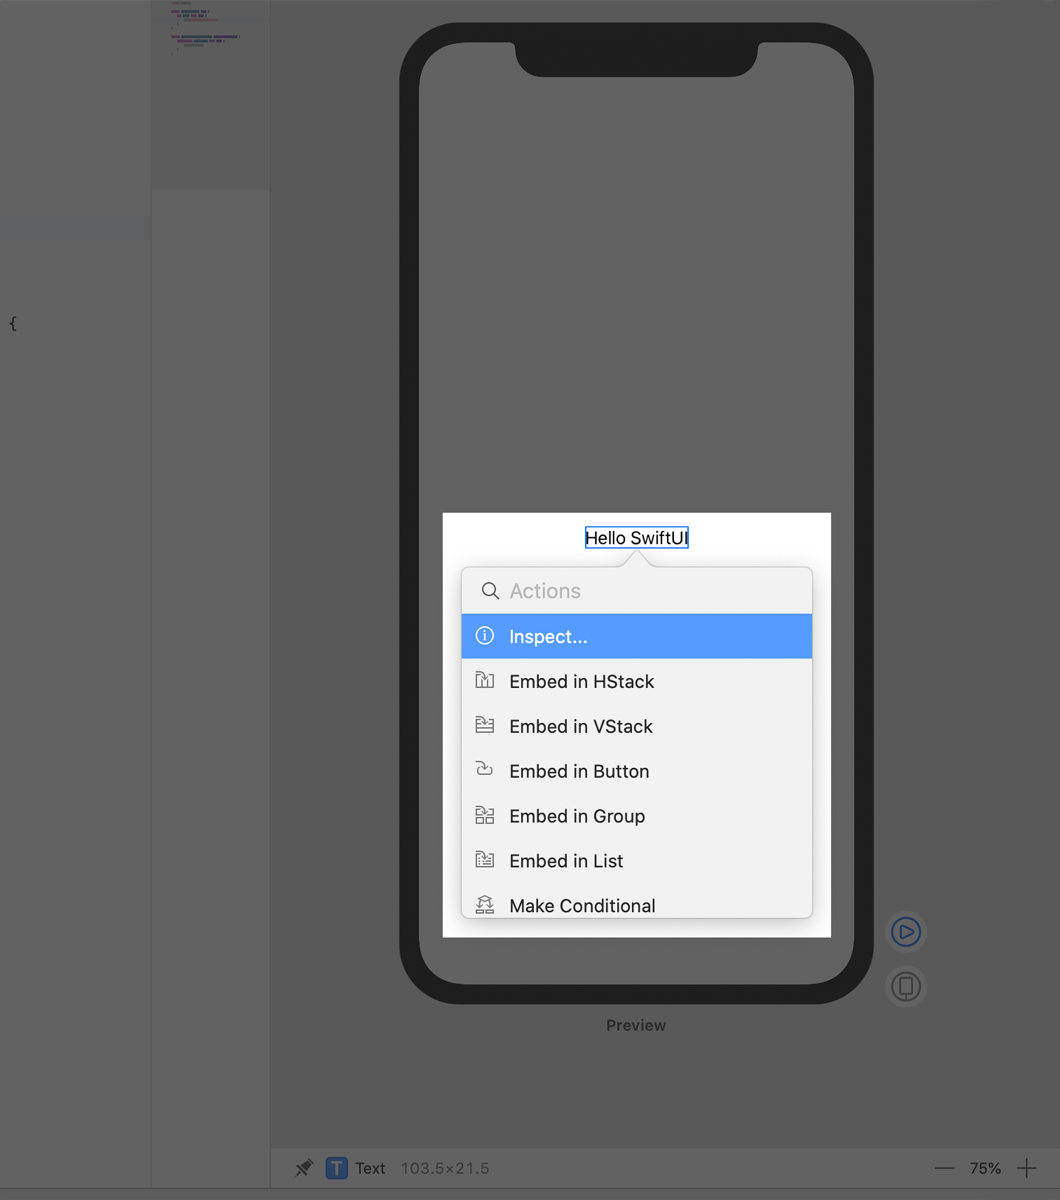
미리보기에서 우리가 편집해본 인사말 스트링을 Command버튼을 누르고 클릭해봅시다.
그러면 에디팅 팝오버 창을 가져올 수 있습니다. 그리고 Inspect를 선택합니다.
팝오버는 뷰(클릭해서 선택한 컨트롤) 유형에 따른 커스텀할 수 있는 속성들을 보여줍니다.
In the preview, Command-click the greeting to bring up the structured editing popover, and choose Inspect.
The popover shows different attributes that you can customize, depending on the type of view you inspect.
Step 2
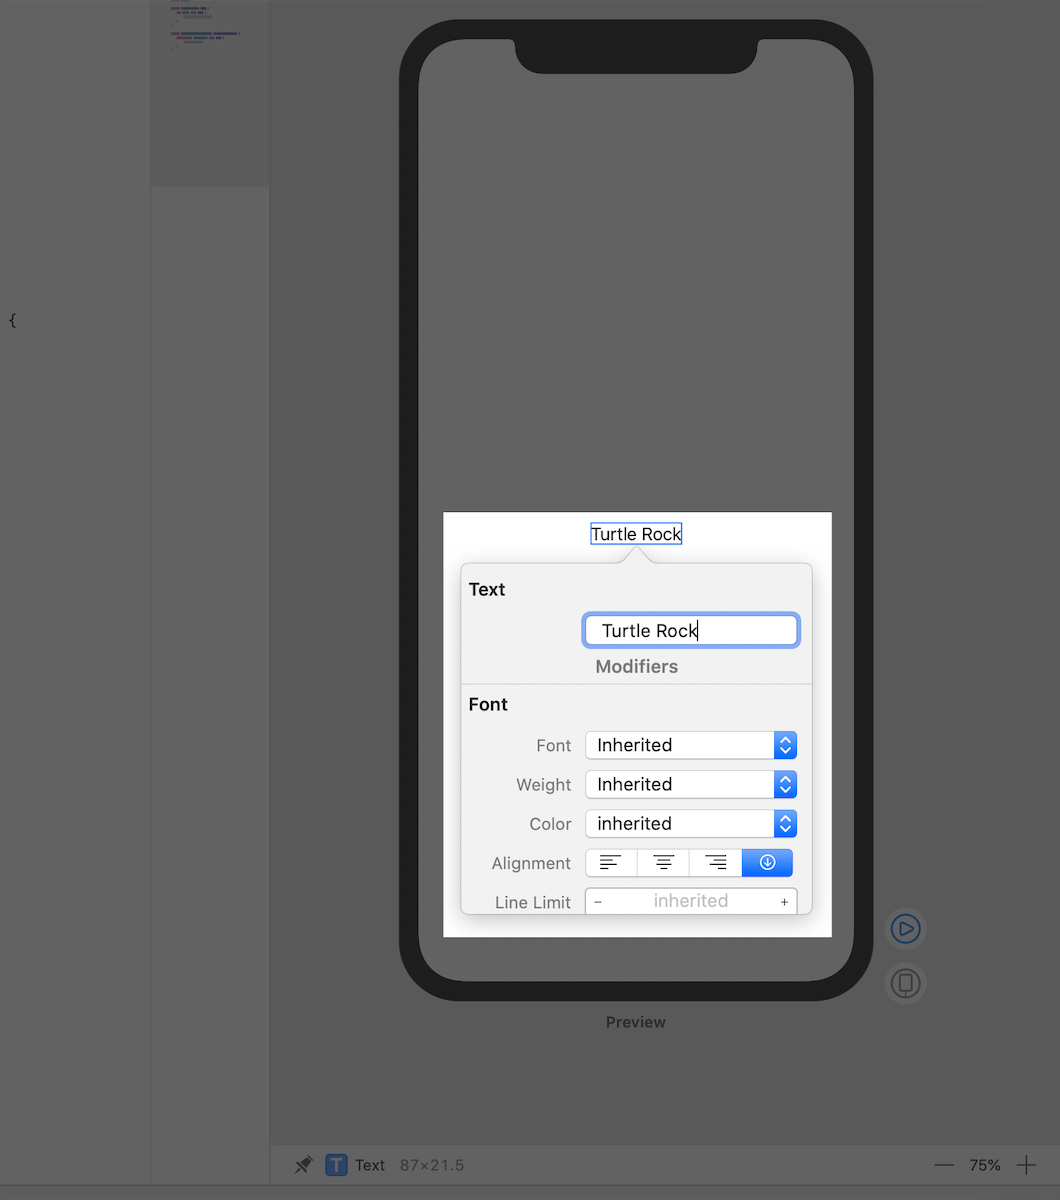
인스팩터를 사용하여 Text를 Turtle Rock으로 변경합니다.
Turtle Rock은 앱에 표시하게 될 첫 번째 랜드마크 이름입니다.
Use the inspector to change the text to “Turtle Rock”, the name of the first landmark you’ll show in your app.
Step 3
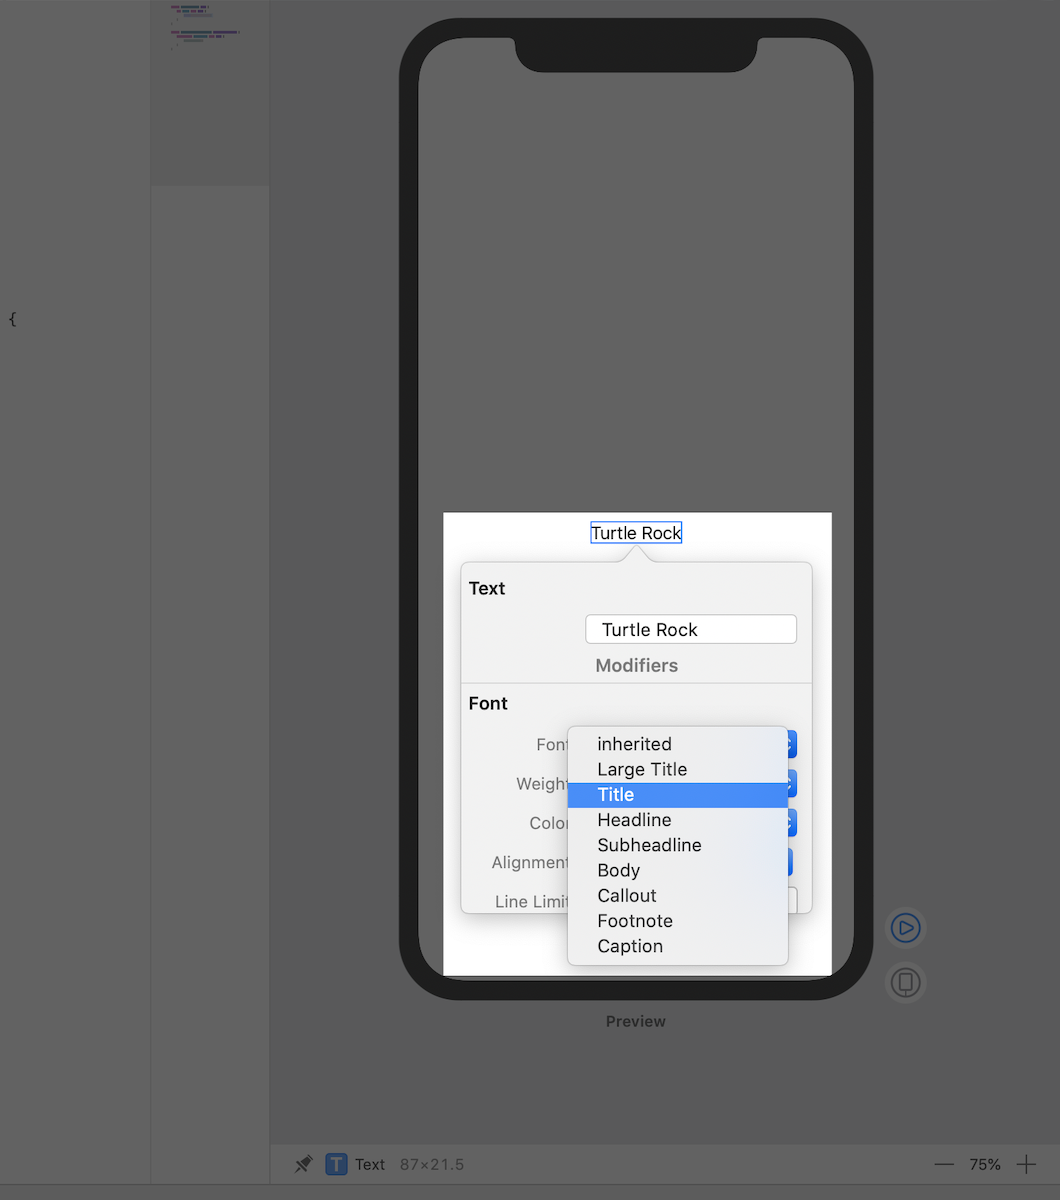
Font의 Weight를 Title로 선택합니다.
이 텍스트에 대한 시스템 폰트 설정은 사용자가 선호하는 사이즈와 세팅에 정확하게 반응합니다.
Change the Font modifier to Title.
This applies the system font to the text so that it responds correctly to the user’s preferred font sizes and settings.
swiftUI를 커스텀하기 위해서 modifiers라는 메서드를 호출하게 됩니다.
modifiers는 뷰의 설정을 변경하기 위해서 뷰를 래핑 합니다.
각 modifier는 새로운 뷰를 반환합니다.
여러 개의 modifier가 체인처럼 수직적으로 연결되어있는 것이 일반적입니다.
To customize a SwiftUI view, you call methods called modifiers. Modifiers wrap a view to change its display or other properties. Each modifier returns a new view, so it’s common to chain multiple modifiers, stacked vertically.
Step 4
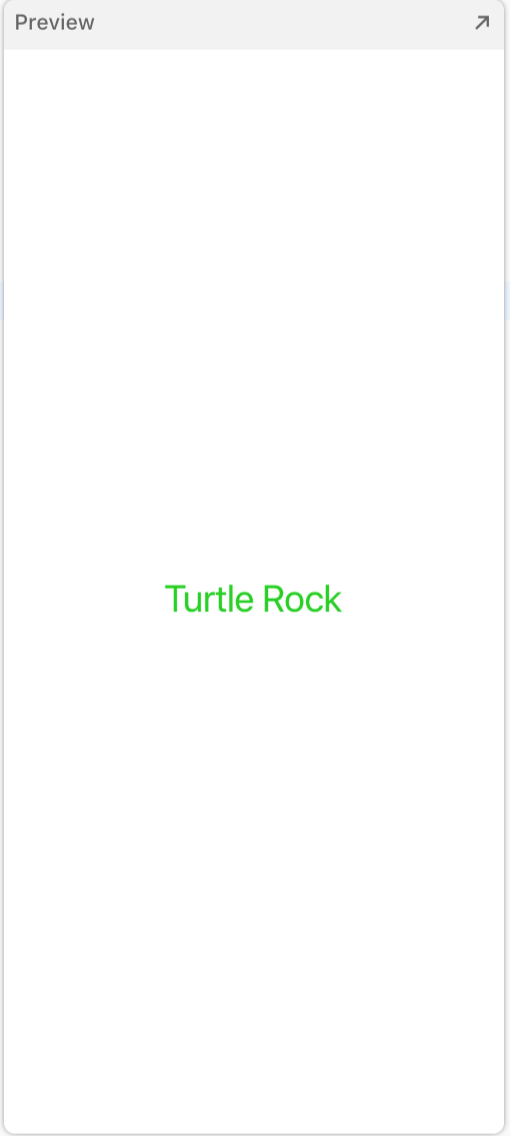
직접 코드로 foregroundColor(.green)를 추가해보세요.
이것은 텍스트 컬러를 녹색으로 바꿔줍니다.
Edit the code by hand to add the foregroundColor(.green) modifier; this changes the text’s color to green.
import SwiftUI

struct ContentView: View {
    var body: some View {
        Text("Turtle Rock")
            .font(.title)
            .foregroundColor(.green)
    }
}

struct ContentView_Preview: PreviewProvider {
    static var previews: some View {
        ContentView()
    }
}
뷰에 대한 코드는 항상 진실됩니다. 인스팩터를 사용하여 modifier를 삭제하거나 변경할 때 엑스코드는 코드를 인스팩터와 동일하게 즉각적으로 업데이트합니다.
Your code is always the source of truth for the view. When you use the inspector to change or remove a modifier, Xcode updates your code immediately to match.
Step 5
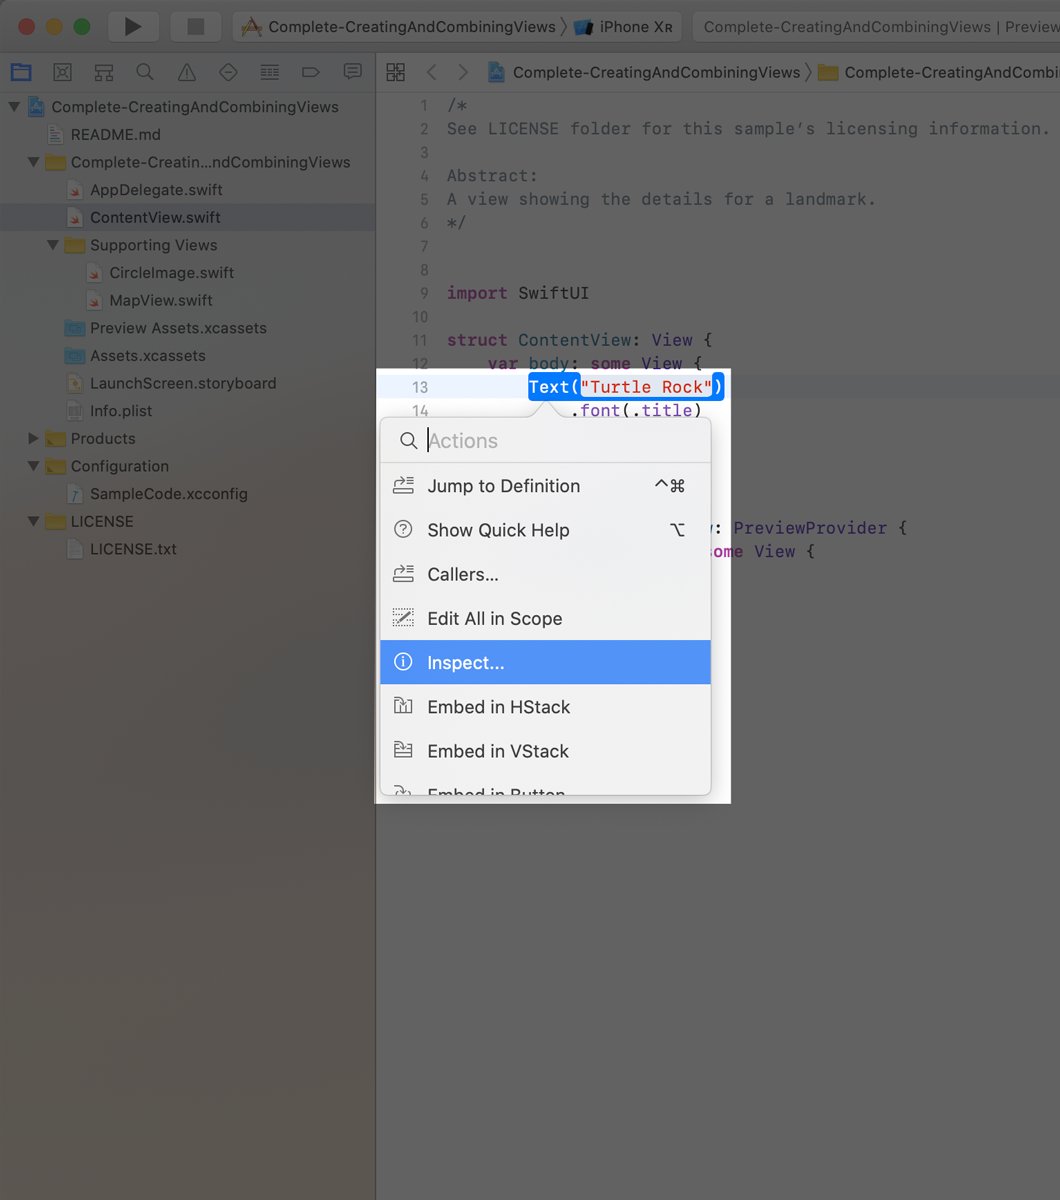
이제 코드 내에 Text 부분을 Command를 누르고 클릭하여 인스팩터를 열어보겠습니다.
팝오버 메뉴에 있는 Inspect를 선택하시고 팝업 메뉴에서 Color를 선택하세요
그리고 텍스트 색을 다시 검은색으로 변경하기 위해 Inherited를 선택하세요
This time, open the inspector by Command-clicking on the Text declaration in the code editor, and then choose Inspect from the popover. Click the Color pop-up menu and choose Inherited to change the text color to black again.
Step 6
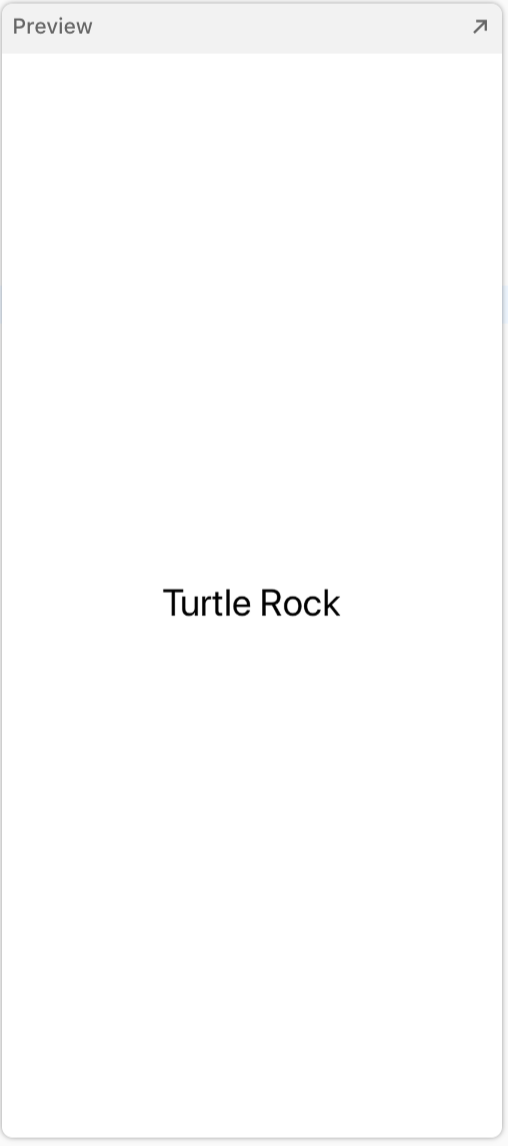
코드에 자동적으로 변경된 사항이 반영되기 위해 Xcode가 업데이트된 것을 주목하세요!
foregroundColor(.green) modifier가 코드상에서 제거됐습니다.
Notice that Xcode updates your code automatically to reflect the change, removing the foregroundColor(.green) modifier.
import SwiftUI

struct ContentView: View {
    var body: some View {
        Text("Turtle Rock")
            .font(.title)

    }
}

struct ContentView_Preview: PreviewProvider {
    static var previews: some View {
        ContentView()
    }
}
스택을 이용한 뷰 조합(Combine Views Using Stacks)
이전 포스팅(섹션)에서 만들어본 타이틀뷰 외에도 랜드마크에 관한 공원의 이름이나 위치같은 세부사항을 포함하는 텍스트뷰를 추가해보겠습니다.
SwiftUI로 뷰를 생성하면 레이아웃이나 동작을 바디 프로퍼티에 구현하게 됩니다.
그러나 바디 프로퍼티는 단일 뷰만 반환할 수 있습니다.
스택을 사용하면 여러 뷰를 조합할 수 있습니다.
스택은 뷰들을 수평적으로, 수직적으로 혹은 앞뒤로 그룹화할 수 있습니다.
이번 내용에서는 가로 스택안에 공원에 대한 세부 정보를 나타내고 제목을 나타내기 위해 세로 스택을 하용하여 가로 스택 위에 세로 스택을 배치할 것입니다.
Beyond the title view you created in the previous section, you’ll add text views to contain details about the landmark, such as the name of the park and state it’s in.
When creating a SwiftUI view, you describe its content, layout, and behavior in the view’s body property; however, the body property only returns a single view. You can combine and embed multiple views in stacks, which group views together horizontally, vertically, or back-to-front.
In this section, you’ll use a vertical stack to place the title above a horizontal stack that contains details about the park.
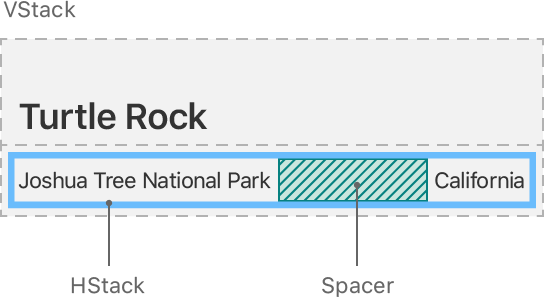
엑스코드의 구조화된 편집기를 이용하여 컨테이너 뷰에 뷰를 배치하거나 인스팩터를 열거나 다른 유용한 변화에 대한 도움을 얻을 수 있습니다.
You can use Xcode’s structured editing support to embed a view in a container view, open an inspector, or help with other useful changes.
Step 1
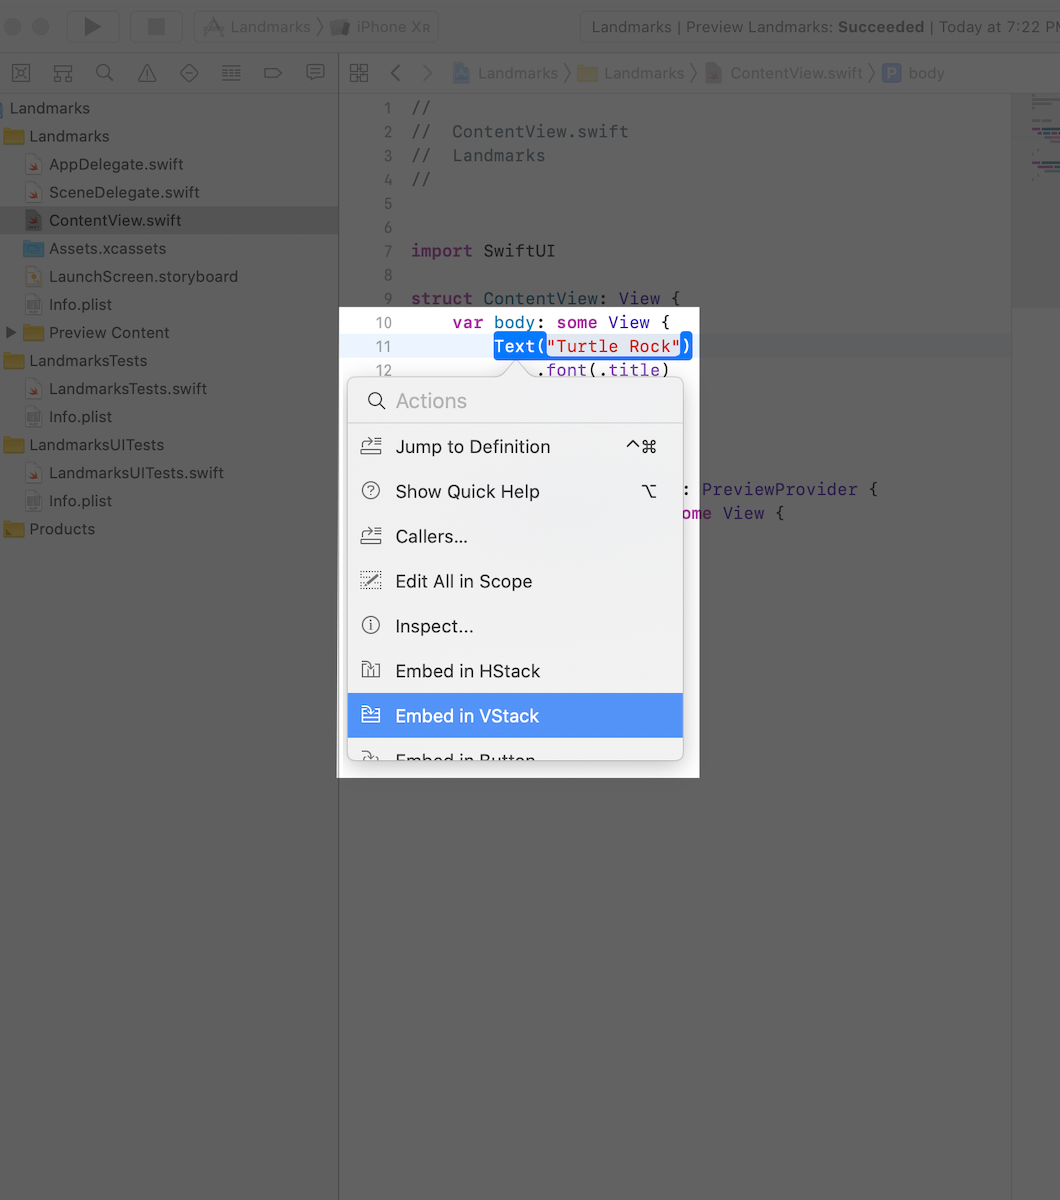
구조화된 편집기 팝오버창을 보기 위해 텍스트뷰의 이니셜라이져를 Command키를 누르고 클릭합니다.
그리고 Embed in VStack을 선택합니다.
Command-click the text view’s initializer to show the structured editing popover, and then choose Embed in VStack.
다음으로 라이브러리에서 텍스트뷰를 드래그하여 스택안에 추가할 것입니다.
Next, you’ll add a text view to the stack by dragging a Text view from the library.
Step 2
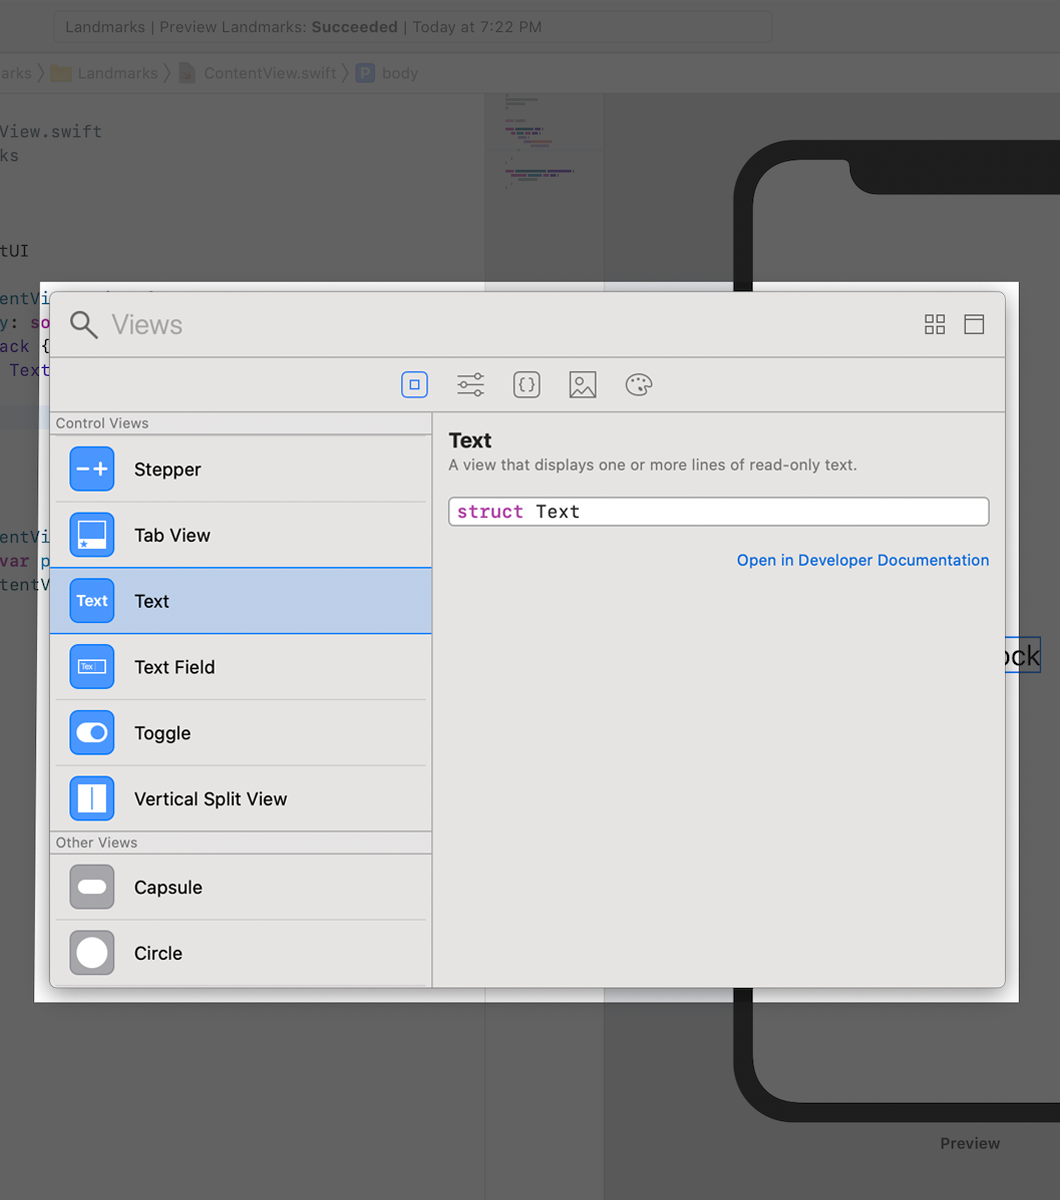
엑스코드 윈도우 상단 우측에 있는 +버튼을 클릭하여 라이브러리를 엽니다.
그리고 텍스트뷰를 드래그하여 코드 상의 Turtle Rock 텍스트뷰 바로 다음에 배치합니다.
Open the Library by clicking the plus button (+) at the top-right of the Xcode window, and then drag a Text view to the place in your code immediately after the “Turtle Rock” text view.
Step 3
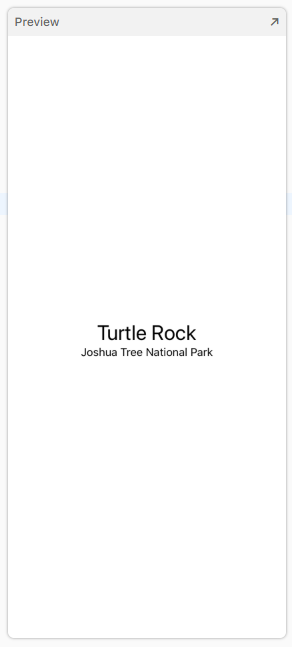
텍스튜부의 플레이스홀더 텍스트를 Joshua Tree National Park로 변경합니다.
Replace the Text view’s placeholder text with Joshua Tree National Park.
import SwiftUI

struct ContentView: View {
    var body: some View {
        VStack {
            Text("Turtle Rock")
                .font(.title)
            Text("Joshua Tree National Park")
        }
    }
}

struct ContentView_Preview: PreviewProvider {
    static var previews: some View {
        ContentView()
    }
}
원하는 레이아웃과 일치하도록 위치를 사용자 정의(커스텀)하세요.
Customize the location to match the desired layout.
Step 4
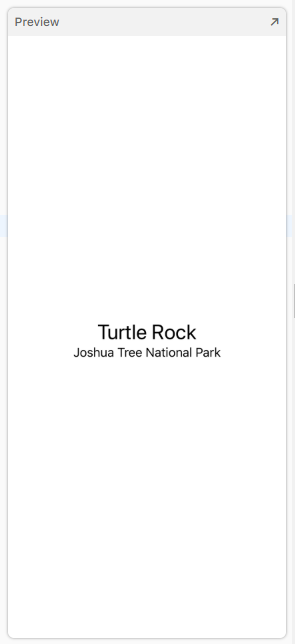
폰트의 위치를 subheadline으로 셋 합니다.
Set the location’s font to subheadline.
import SwiftUI

struct ContentView: View {
    var body: some View {
        VStack {
            Text("Turtle Rock")
                .font(.title)
            Text("Joshua Tree National Park")
                .font(.subheadline)
        }
    }
}

struct ContentView_Preview: PreviewProvider {
    static var previews: some View {
        ContentView()
    }
}
Step 5
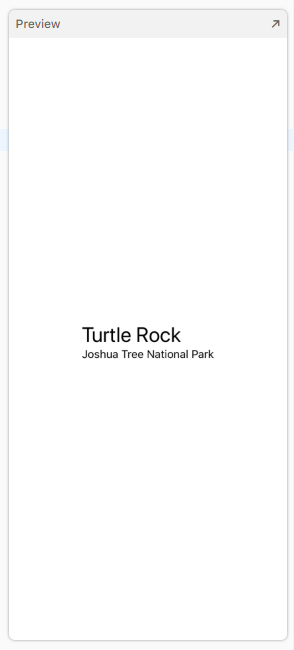
VStack 이니셜라이저를 편집하여 앞 가장자리를 기준으로 뷰를 정렬합니다.
기본적으로 스택은 내용을 축을 따라 중앙에 배치하고 상황에 맞는 간격을 제공합니다.
Edit the VStack initializer to align the views by their leading edges.
By default, stacks center their contents along their axis and provide context-appropriate spacing.
import SwiftUI

struct ContentView: View {
    var body: some View {
        VStack(alignment: .leading) {
            Text("Turtle Rock")
                .font(.title)
            Text("Joshua Tree National Park")
                .font(.subheadline)
        }
    }
}

struct ContentView_Preview: PreviewProvider {
    static var previews: some View {
        ContentView()
    }
}
다음으로 오른쪽 위치에 다른 텍스트뷰를 위치하게 됩니다. 이번 텍스트뷰는 공원의 위치와 관련됩니다.
Next, you’ll add another text view to the right of the location, this for the park’s state.
Step 6
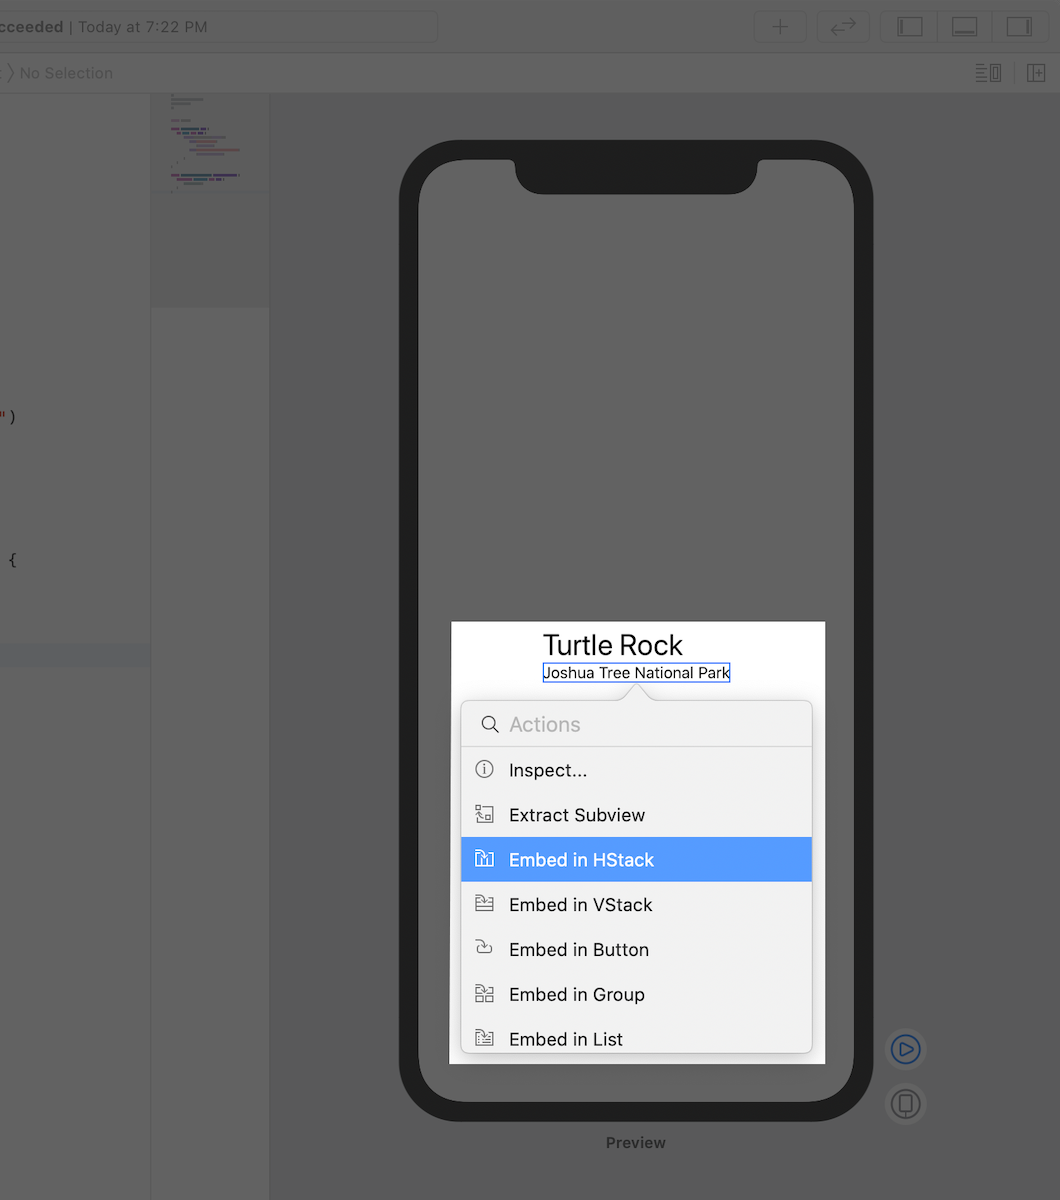
캔버스에서 Joshua Tree National Park위에서 Command키를 누르고 클릭합니다.
그리고 Embed in HStack을 선택합니다.
In the canvas, Command-click on Joshua Tree National Park, and choose Embed in HStack.
Step 7
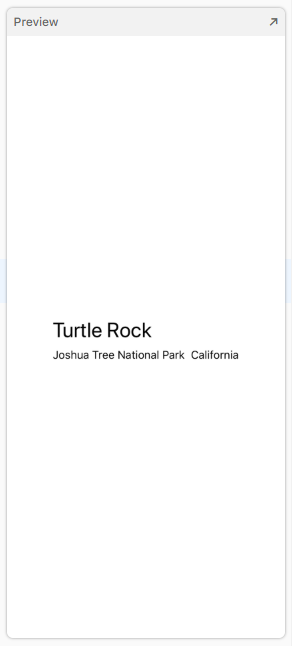
새로운 텍스트뷰를 위치시킨 다음에 플레이스홀더 텍스트를 공원의 위치로 변경하고 폰트를 subheadline으로 설정하세요.
Add a new text view after the location, change the placeholder text to the park’s state, and then set its font to subheadline.
import SwiftUI

struct ContentView: View {
    var body: some View {
        VStack(alignment: .leading) {
            Text("Turtle Rock")
                .font(.title)
            HStack {
                Text("Joshua Tree National Park")
                    .font(.subheadline)
                Text("California")
                    .font(.subheadline)
            }
        }
    }
}

struct ContentView_Preview: PreviewProvider {
    static var previews: some View {
        ContentView()
    }
}
Step 8
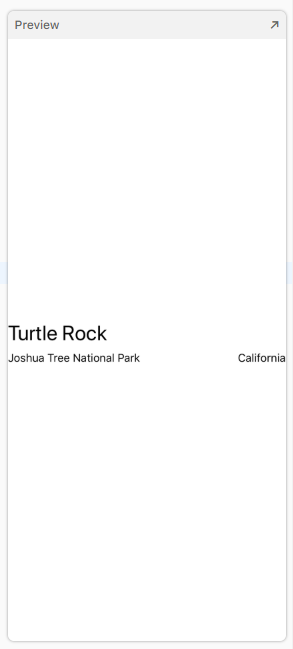
디바이스의 전체 가로 너비를 사용하려면 두 개의 텍스트뷰를 포함하는 수평 스택에 스페이서를 추가하여 공원과 주소를 분리할 수 있습니다.
스페이서는 확장됩니다. 이것은 포함된 뷰가 콘텐츠에 의해 정의된 사이즈만 갖게 하는 것이 아닌 부모 뷰의 모든 공간을 사용할 수 있게 만듭니다.
To direct the layout to use the full width of the device, separate the park and the state by adding a Spacer to the horizontal stack holding the two text views.
A spacer expands to make its containing view use all of the space of its parent view, instead of having its size defined only by its contents.
import SwiftUI

struct ContentView: View {
    var body: some View {
        VStack(alignment: .leading) {
            Text("Turtle Rock")
                .font(.title)
            HStack {
                Text("Joshua Tree National Park")
                    .font(.subheadline)
                Spacer()
                Text("California")
                    .font(.subheadline)
            }
        }
    }
}

struct ContentView_Preview: PreviewProvider {
    static var previews: some View {
        ContentView()
    }
}
Step 9
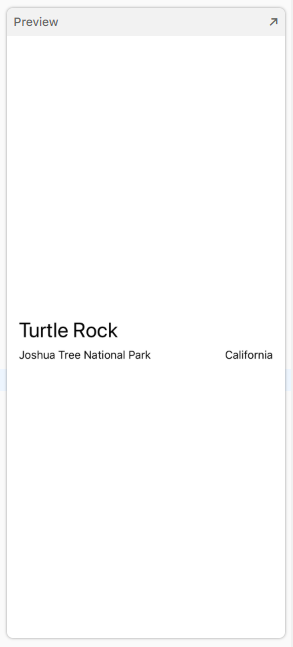
마지막으로 랜드마크와 세부 내용 사이에 약간의 거리를 주기 위해서 padding() 수정자(modifier)를 사용합니다.
Finally, use the padding() modifier method to give the landmark’s name and details a little breathing room.
import SwiftUI

struct ContentView: View {
    var body: some View {
        VStack(alignment: .leading) {
            Text("Turtle Rock")
                .font(.title)
            HStack {
                Text("Joshua Tree National Park")
                    .font(.subheadline)
                Spacer()
                Text("California")
                    .font(.subheadline)
            }
        }
        .padding()
    }
}

struct ContentView_Preview: PreviewProvider {
    static var previews: some View {
        ContentView()
    }
}
#swiftui란
#swiftui 기초
#swiftui 기본
#swiftui 강좌
#swiftui 강의
#swiftui 교육
#swiftui 시작하기
#swiftui 따라하기
#wwdc2019
#ios programming
#swiftui 번역
#swiftui apple tutorial 번역
#swiftui apple 튜토리얼 번역
'IT > Swift' 카테고리의 다른 글
| SwiftUI 튜토리얼 2-1 네비게이션가 리스트 만들기 (0) | 2019.10.22 |
|---|---|
| SwiftUI 튜토리얼 1-2 뷰의 생성과 조합 (0) | 2019.10.20 |
| SwiftUI - UIHostingController (0) | 2019.10.16 |
| SwiftUI 시작하기 (0) | 2019.10.14 |
| [swift] throw, do-catch, rethrows, defer (0) | 2019.10.09 |


